
What Exposure time do i need for my resin?
- Aug 16, 2021
- 10 min read
Hopefully i can explain how to do exposure tests and why they are important to keeping your printer performing optimally while turning out decent prints.
In my limited experience ( i am not claiming to be an expert here but have been around enough to have been able to work a few things out that has made my resin printing more dependable ) there are 4 main reasons prints fail. This is not to say there are not more obscure reasons that pop up time to time, or that hardware/mechanical failure does not happen. those are just not going to be covered here.
This is more for the person just starting out with resin printing that needs a bit of a helping hand to understand why things might not be printing right or looking as they should.
Lets first define the term "failed print"
In my dictionary, a failed print is any print that has not turned out the way it was intended. either the file didn't completely print leaving voids, the supports failed, the file did not stick to the build plate, supports fused together or fused to the print so completely that you cannot remove them without damaging the surface of the print, or maybe the print does not have the fine detail that the original stl had.
There are other ways things can go wrong, like mechanical failures. holes passing through prints would indicate a LCD screen failing, Prints not sticking to the entire print bed surface is normally down to bed leveling. I am not covering those here.
What i will cover is the 4 main reasons you could have failed prints.

To start with, we need a bit of understanding about what the resin printing process actually does. In a nutshell what we are doing is taking a light sensitive material ( the resin ) and exposing it to a light source ( the LED screen ) in incremental layers until the subject is complete.
Under exposed resin = resin not introduced to enough UV light to become solid, if not exposed long enough the resin will be in a state between liquid and solid and will not support further layers as the print continues. The prints will also lack definition as the under exposed resin will simply wash away in the wash and cure process.
Over exposed resin= resin exposed to UV light for too long while printing. This problem can cause tolerance issues with moving parts or joins where two parts should fit flush with the use of alignment pegs. Over exposure can also cause a problem with premature wear on the FEP film of the printer as over cured resin adheres itself to the FEP stronger than properly cured resin, this makes it so every time the printer lifts to start a new layer it can actually stretch the FEP further than intended and basically wear it out.
Under Supported files= If the files you choose to print do not have proper support, the prints will be prone to failing. There are very few prints out there that are designed to be printed flat on the print bed. This is intentional simply because printing something with a lot of flat surface area can cause a problem of "suction" while printing which can also cause a print to fail or cause damage to the FEP. there are ways around it which i will try to come back to later.
Bad Resin= this is not to say the resin itself is not good. this is more aimed at the companies that make resin that require you to mix and/or stir the resin in between every print as for some reason the binders in the resin seem to separate and cause more fails than others.
How do you know if your resin is under or over exposed?
Run validation tests
How often should you run Validation tests?
Any time you change resin brands or even resin colors from the same brand. There is no magic exposure time that works with every type of resin. The pigment added to resin effects the exposure times which is why you will need to run them when you use different colors from the same brand.
Where can i get the files for the validation tests?
There are 2 main ones i use and the links to each are below
Photonsters Validation Matrix v2
Ameralabs Town Calibration file
Today i am going to focus mainly on the Photonsters Validation file, and explain the how and why you will need to run this multiple times in order to dial in your printer to work optimally.
download both files to your pc (and remember where you saved them)

About my setup here.... I have a Nova3d Bene4 Mono 3d SLA Printer. For the Purpose of right now i am only going to be talking about the Slicer functions that came with the Printer. Every Slicer will have similar setup features ( chitubox, Lychee, Prusa ) and the workflow will be essentially the same for all in order to get them dialed in.
You will have to know what the standard base line or starting point is for your machine. Non MONO screens were normally 7-8 seconds exposure time. with the implementation of the MONO screens, this time was cut down dramatically. Your setup book or instructions should give you a "starting point".
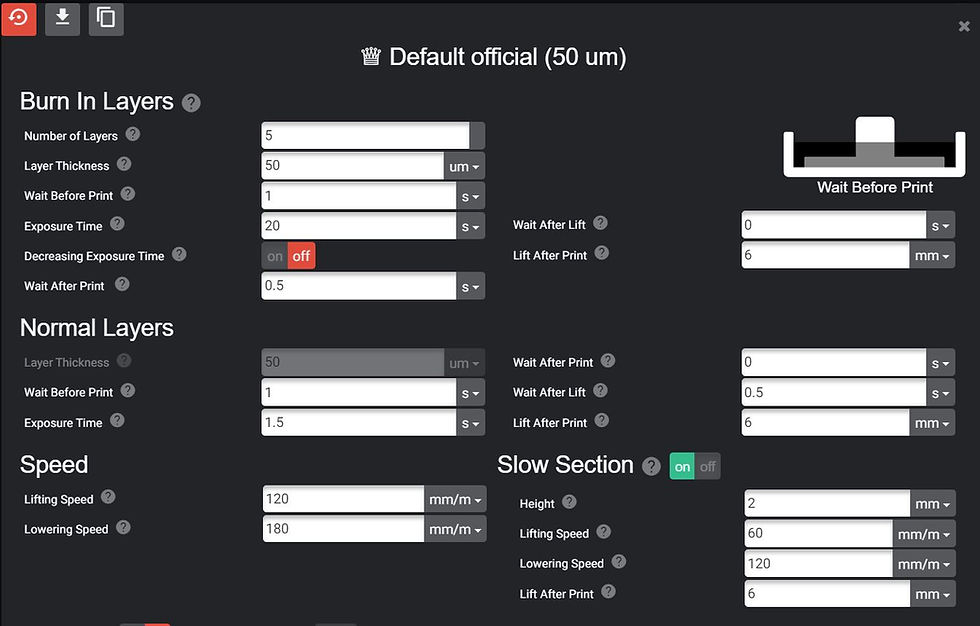
You will need to find the settings section of whatever slicer you are using.
For Lychee it looks like this:
Chitubox:

and Novamaker: ( proprietary software for the Nova3d Printers )

The only thing i am focusing on in these initial tests is exposure time. it is the single most important setting to get right if you want successful prints on a regular basis. Do not alter any of your settings to match my own, regardless of what slicing software you use. We are not playing with things like lift speed, stop time, or delay. You will notice that for the chitubox and lychee example images above, the exposure time is way up there. that is the default when you open the applications. Since i do not use either to slice ( for a while Nova3d made it so only Novamaker could produce cws files which my printer reads, since then Lychee has added that function but i have not played with it enough to give a credible recommendation for it.) I left their settings as stock for the images.
My initial starting point when i first started printing with the MONO was set at about 3 second exposure time. I didn't think much of it back then because everything was printing and i was still relatively new to 3D printing so in essence... i didn't know any better. Fast forward to now... I was last using Elegoo Water Washable Resin in grey ( i know some of you swear by this but i have gotten to the point where i rank it very low on my list of favorable resins.) to get anything to print i had to have nearly a 3 second exposure time and i was still getting excessive failures every 2 or 3 prints. I came to find out that if i did not stir/mix/ or do some other form of blending before each print, i would get a failure with this resin. The last half bottle went in the bin, i don't have time for that silliness.
Now i will walk you through the process i use to dial in for a fresh bottle of resin from a different manufacturer. I have used this brand before so i know how it behaves but i am at a point in my printing journey where i know how to effectively dial things in to the point where i dont think i can make it any better.
I open up my slicer and load the Photonsters validation file into it. This file gets the brunt of the work because it is fairly quick to print and is easy to read. Here is the trick.... i am going to prepare multiple sliced files of this same stl. each one with a different exposure time on it.

i named them so it is easy to remember, these files will live on my pc in a folder until i need them again in the future when i change resins again. val for validation and the exposure time in seconds.
it takes a bit of time to do, but when you figure it is more of a one time task to do the slicing and keep the files, its not so bad.
Please keep in mind, every printer has its limits. If you have a machine you can get 100% dialed in without diminishing returns then you are on a winner. the rest of us have to get as close as we can and be happy with the outcome knowing it is as good as we can make it.
lets see what the results bring us.

this is the 2.9 second exposure test. clearly with the new resin it is way over exposed. down the left hand side you can see the smaller holes are filled in, the center of the infinity print in the middle has an overlap and if you look at the bottom bars, the way the validation is meant to print. each of the upper bars should look like they would fit "into" the slots below them. this clearly cannot happen because some of the slots are essentially closed from over exposure. OK so now we know we need to trim back the exposure time. i will pull it back .2 seconds and run the print again.

2.7 seconds exposure time did not make much difference with the over exposure problem. Next we will do 2.5

Same problem, still over exposed. keep in mind i have just trimmed .6 seconds off the exposure time per layer that i needed to have to work with the Elegoo resin.
Lets knock it back another .2

at 2.3 we start to see a little bit of improvement, but it is no where near being right yet.
off comes another .2

at 2.1 we are a bit better, the connection point on the center infinity print is shrinking and the lower bars are reducing in width while the slots are expanding slightly.
off with another .2

at 1.9 seconds exposure time we are making some progress, still not quite there though. This is after shaving a full 3rd of the exposure time of the last resin.
off come 2 more....

At 1.7 the infinity print in the middle comes together at a sharp point, i got a bit clumsy with the validation file after the wash cycle and my big fingers accidentally squished the side bard for the bottom bar test so please ignore them in the pic other than the fact that the gaps are almost just right to fit the uppers into the lowers.
lets try loosing another .2

At 1.5 seconds this is about as close as my printer will get to making a perfect print. you can see on the outer most bars the lines are so fine that they essentially folded over and fell off in the wash cycle but the center larger ones look as close as possible to being able to fir inti their lower negative spaces. holes on the left are open except for only the 2 very smallest ones and the infinity print comes to a sharp point.
lets try to push it just one more time
off comes another .2

At 1.3 you can see the same problem that was starting with the 1.5 print previously while the print is not a total failure i am loosing more of the finer lines of the print because they are just not substantial enough to remain after the wash. overall it is still fully useable as a print speed, if i am printed things designed without supports. Think of each of those smallest lines that didn't print...as the tips of supports that should be supporting more resin as the print progresses.
since we have looked at this incrementally it is hard to see the difference in each pic, but if i put them side by side.

Since i now have an idea of the capabilities of this combination of my resin and my printer, i now have to decide which setting to leave in my slicer to make my life easier all the while i am printing with the same resin.
How do i do that?
I print a copy of the ameralabs town test print
First speed i will try the town at is the lowest i have pushed it to.
starting with a 1.3 exposure time this is what i am left with.

at 1.3 it is not a "bad" print, but it is definitely not a good print either. if you look at the right of the pic , besides the crosshair there is a spire that is supposed to have a sharp point on it. it looks dull and rounded. also overall the print looks a bit "smooth" which is an indication of not being exposed enough to leave crisp detail.
i am going to back the slicer up to 1.5 and see how that does
...

While i jumped the gun and took this pic a bit premature ( its still wet from the wash process lol ) you can clearly see that the 1.5 left me with a sharp spire instead of a rounded one. and 95% of even the smallest micro columns have printed . I will throw another angle of this print up.

From the backside, the slots, cutouts and overhangs have all printed fine including the checkerboard. the layer lines look like they are pronounced in this pic just because it is zoomed in so much. in reality it is not nearly as bad ( thats a different tweak setting for a different day )
Another side benefit of dialing in these settings is to speed up your printing times.
as an example

if you do the math, this figure has 4490 layers, compared to my 2.9 second base time. if we subtract 1.4 seconds off each layer.....thats 6,286 seconds saved on a print. Otherwise known as 104 minutes or 1 hour and 44 minutes. Thats a considerable difference when it comes to printing.
i am not getting into supporting files today or more precisely .. under supporting files.
But i will say a word about a few different resins i have tried. i am not a fan of resins you have to constantly stir or agitate in order to continue getting decent prints out of them. The stuff i have just loaded is from Phrozen and i had used them before. it is basically bulletproof. i left some in my vat for 2 weeks before when i was on a long run of work and didnt have time to print anything. didnt have to stir, shake or do the jig... simply hit print when i had time and never had an issue. It is what all resin manufacturers should strive for. Make things a bit easier on the end user.
**One more word of caution**
If you have A print failure
you 100% must strain your vat of resin before you can continue. all it takes to destroy your printers LED screen is to have a small bit of partially cured resin caught between the build plate and the screen and have it get compressed ( driven into the LCD ) on the next print.
i keep a tupperware bowl with a lid on it in the hobby room for when i do have prints fail. i pull off the print bed and clean it, i remove the resin vat and pour the resin through an automotive paint strainer ( https://www.amazon.co.uk/Disposable-Strainers-Silicone-Collapsible-Automotive/dp/B08N6KDDGG/ref=sr_1_8?dchild=1&keywords=paint+filter&qid=1629081156&sr=8-8 ) and clean the FEP before i continue onto the next print.
I hope this helps give a bit of direction to some of the new printers out there.
Happy Printing!


Comments